What is object detection
- Bounding boxes
- mAP – Mean Average Precision
- Prediction Confidence
- Fast (er) R-CNN, HOG, SSD etc. YOLO is the most recent and most effective
Prior to YOLO, object detection systems used classifiers or localizers to perform detection. Essentially, they would take an object from the list of classes, and they make several different cuts of the image being observed to see if any of those cuts are like the class in question. The network outputs a probability for only one given class in each pass. This means, the original image must be read several times (for different sizes and orientations of the object) to be able to find areas of the image that the “object” we are looking for lands on. And then we must repeat this for all the classes in our list. All of this adds to going several hundred iterations for each image. This means a lot of compute power needs to be spent, and it is not going to be fast. Real time video with frame rates above 30fps, forget about it.
What is YOLO V4
YOLO is the state of the art, real time Object detection system developed by Joseph Redmon at UoW. As opposed to the prior detection systems, YOLO uses a single neural network to process an image. Even though it too divides the image into regions and predicts bounding boxes, it does all of that in one pass, for the entire image and all of the object classes. Hence, the cheeky name “You only look once”, YOLO. Because of the fundamental difference in the way YOLO approaches detection, it is blazing fast, compared to the earlier detection systems like R-CNN and fast R-CNN. (1000X and 100X respectively)
For a deeper understanding of the YOLO system, I strongly recommend reading their paper and spending some time going through the math, the network design, training and evaluation.
Alexey’s GitHub repository is a phenomenal source for learning more in depth stuff about YOLO. All of what you are about read and see in this blog are based on his very well written instructions. My aim was to simplify it a little bit and make it more accessible.
What is Darknet
Don’t be scared by the sinister sounding name. Unlike the ubiquitous dark-web which is internet’s official black-market and shit hole, Darknet is simply a neural network. This neural network is open sourced and is written in C and CUDA. This can be compiled both for CPUs and GPUs, on both Linux and Windows flavours. I have tried it on my both my windows machines and Linux machines and had no issues whatsoever. It comes with a beautiful Python wrapper so you can run it with very little code both to train and test.
The great advantages of Darknet neural network are as follows:
- All the source code is provided with the necessary configuration files. All you have to do is compile it to your working operating system. Further down in this blog, I will be walking you through installing and running it off Google’s colab.
- Comes with pre-trained weights for MS COCO dataset.
- Comes with partially trained weights if you want to train your own classes. I have a blog coming up to walk you through training your own model with your custom classes.
- You can train the model on a GPU (Which is the most computationally expensive process, but then you can use it on a CPU for detection and even in production systems)
What is MS Coco dataset?
COCO stands for Common Objects in Context and consists of thousands of labelled images for 80 different classes. Each of these images contains one or more of the classes and has a “labels” file which tells us where the bounding boxes are for those classes. This is the dataset used by the designers of darknet to train and evaluate the model. COCO data set has long been used to benchmark various object detection models. As I have said earlier, they have also made available the fully trained weights available for us, so we can simply use them to test the detector without having to worry about training the model from scratch. This is especially useful if you are just trying out the YOLO darknet to make it part of your product pipeline. You do not have to go through the trouble of setting up the training process and spend time training the model. However, this only works if your data set consists predominantly of the 80 classes in the COCO data set. If you want to train your own models, I will show you how to do it in the next blog post.
Object Detection
Let’s talk about Object detection in general. If we go back to the original days of machine learning, it all started with United States Post Office’s attempts to read handwritten digits (Zip codes) off the envelopes. We have come a long way since, and the original state of the art has now become sort of “Hello, world” of machine learning. Progress.
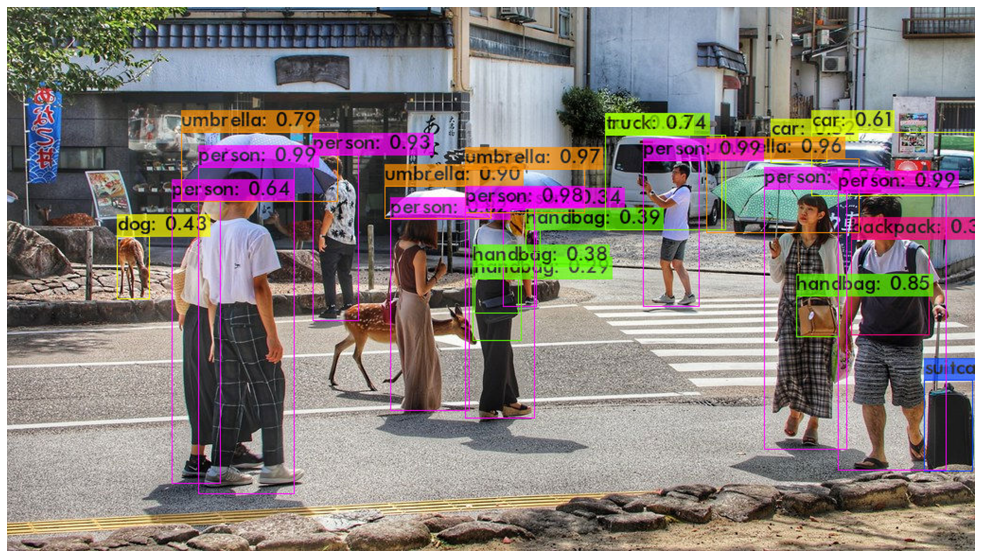
The more recent developments in “computer vision” and general object detection can do a lot more than read a hand-written digit. They can detect multiple objects within an image with great accuracy and provide “bounding boxes” around those objects and prediction probabilities too. On top of that specialized models have been developed which can detect human faces in images, and what emotions those faces are showing. Even more, they can also detect who is the actual person in the picture. I am sure you have notice how when you post pictures on Facebook, it instantly offers to tag people in the pictures with remarkable accuracy. That is facial recognition at work and is a subclass of image recognition models.
YOLO on Colab
Ok, that’s enough introduction and its time to get your hands dirty with YOLO. The easiest way to get started is to try it out on Google’s Colab. Colab comes with all the necessary libraries pre-installed and can get the job done with minimal effort. Once you have done it a few times on colab, you can choose to run it locally on your own hardware. Let’s get started. Just an FYI, the instructions below are all based on Alexy’s GitHub wiki, and you might as well follow them verbatim. But if you want a little explanation to go with those instructions, please read on.
Prerequisites:
- A google account which will also allow you to connect to colab.
- A few images to try out at the end.

Coming up…….
- Train your own classes
- Other uses of Darknet
If you have any questions or feedback about this blog post, feel free to reach out to me on my LinkedIn.